
INTRO
It’s a beautiful spring day. The birds are chirping, the grasshoppers are hopping, the sun is peeking through cotton candy clouds, and the wind is blowing… through the unmanageably tall grass that has been getting on your nerves. Your fields look more like a jungle. But don’t worry! You just bought a rotary cutter. You’ll have that grass cut in no time.
The rotary cutter is a powerful—and essential—piece of equipment, built to make quick work of your fields. These cutters come in many styles and designs, which gives you the ability to choose the best cutter for your tractor and your land.
Most users find the rotary cutter to be intuitive and easy to run. But did you know that there are some things you need to check before running the cutter?
Just like with any other kind of equipment, a rotary cutter will experience some wear with its intended use. Thankfully, you can spot a small issue before it becomes a big one, if you know what you’re looking for. Read this article to learn about the four things you should check in order to properly maintain your cutter.
Before we begin, remember: you should always read your manual for the best information about your rotary cutter, including assembly, operation, and safety practices.
(Also, don’t forget to complete the Pre-Delivery Checklist and Warranty Registration in your manual BEFORE the first operation of your rotary cutter.)
Let’s get started.
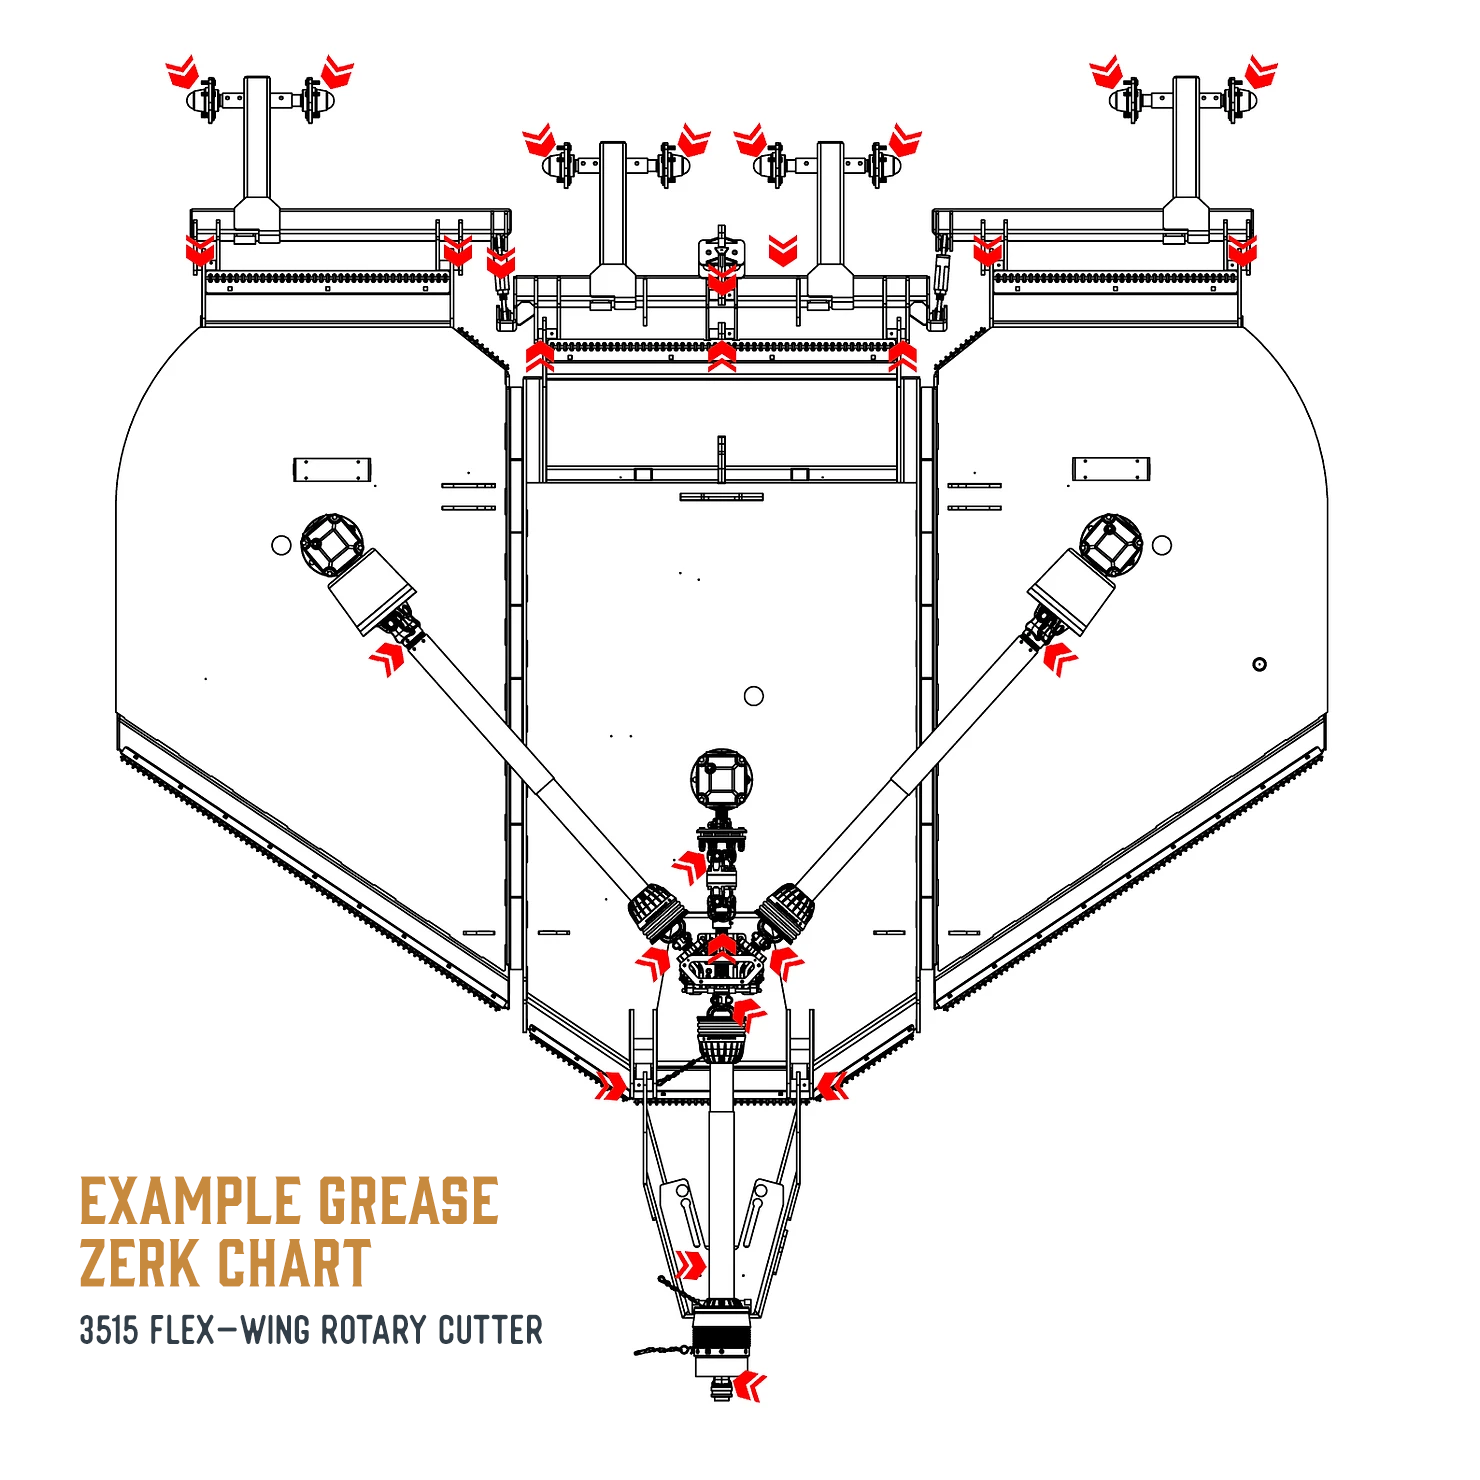
1. MAKE SURE THE GREASE ZERKS ARE PROPERLY GREASED
Whether you’re running your rotary cutter for the first time, or for the hundred-and-first time, you need to check to make sure the grease zerks have enough grease. The grease zerks feed lubricating grease to the joints, turnbuckles, swivels, and tailwheel hubs of your rotary cutter to keep them from generating too much friction during use—which can harm the equipment.
The tailwheel hub and the tailwheel pivot tube on wheel arm should be greased with every use.
We recommend using SAE multipurpose high-temperature grease with extreme pressure (EP) performance. If your grease is low, of course, you’ll need to add grease to the zerks. You can find the location of all the grease zerks on your rotary cutter by reading out the Greasing section of your product manual.
When you grease the zerks:
-
Always use a handheld grease gun for all greasing.
-
Wipe grease zerks with a clean cloth before greasing to avoid injecting dirt and grit.
-
Apply grease until new grease can be seen coming out of the joints.
-
Don’t let excess grease collect on or around the parts, particularly when operating in sandy areas. Replace broken grease zerks immediately.
If any zerk will not take grease, remove and clean it thoroughly. Also clean the lubricant passageway. Don’t forget to check for signs of leakage. You can order a replacement zerk through your dealer if you need to.
For more information on greasing, please read your product manual. You can find a digital copy of your IronCraft product manual on the rotary cutter’s product page. You can find the Rotary Cutter Selection page here.
2. CHECK THE GEARBOX AND DRIVELINE LUBRICATION LEVELS
After you’ve checked the grease zerks, go ahead and take a look at the gearbox and driveline lubrication levels. You’ll want to make sure that everything has proper lubrication to protect your rotary cutter during use.
GEARBOX
Before you begin, make sure the cutter is level when checking the grease in the gearbox in order to get an accurate read.
While the gearbox of a IronCraft rotary cutter is filled at the factory, the lubrication level need to be checked by both the dealer and the buyer before the cutter’s first use. That way, if the gearbox is low on grease, you won’t be running the rotary cutter without proper lubrication. If grease is required, it should be added until it reaches the proper level. Not sure how much grease to add? Check your product manual for grease capacity.
We recommend using EP-0 Grease with a IronCraft rotary cutter’s gearbox. The gearbox needs to be checked and filled (if necessary) with every twenty-five (25) hours of use.
Be careful not to overfill the gearbox! Overfilling the gearbox could cause pressure to build up and cause the seals to leak. For more information of filling the gearbox, check out your rotary cutter’s manual.
DRIVELINE
The rotary cutter’s driveline should be greased with every eight (8) hours of use (this includes the inner shaft as well as U-joints, and shield bearings). Make sure to lubricate all driveline slip joints, U-joint crosses, and the center of driveline CV joint (if applicable).
Greasing the driveline will be a little different with every rotary cutter, based on its size and design. For step-by-step instructions on how to fill the driveline lubrication grease you should, as always, refer to your product manual.
3. CHECK THE BLADES
Is your rotary cutter properly greased? Great! The third thing you should do is check the blades before each use. Your blades are going to be putting in a lot of work—you’ll want to make sure that they are properly installed and in good working condition.
So, what are you looking for? Well, if any blade is bent, excessively nicked, worn, or has any other damage, you’ll want to replace both blades on the spindle. If your blade has only a small nick, however, it can be ground out when sharpening your blades.
You can check your blades for looseness by manually rocking the blades and blade carrier. If any part of the blade assembly (i.e. blade bolt or carrier nut) is loose, retighten it. You should check for looseness before and during each time of use and for general maintenance check the torque every fifty (50) hours.
If you’re installing your blades, you can check the blade bolt pivot diameter for any wear.
Want to know more about checking and maintaining your blades? You can find specific instructions on Blade Removal, Blade Installation, and Blade Sharpening in your product manual. If you need to purchase replacement blades, contact your IronCraft dealer.
4. MAKE SURE THE SLIP CLUTCH IS OPERATIONAL, AND ADJUST AS NECESSARY
The slip clutch is one of the most important parts of your rotary cutter. If your blades hit a rock or a log or anything too-big and too-tough to cut through, the clutch will “slip” out of place in order to protect your driveline, gearbox, and tractor. Each rotary cutter will have one or more slip clutch, depending on the size and design of the cutter.
You’ll want to check the slip clutch 1) before its first use, 2) if your rotary cutter has been in storage for more than 30 days, or 3) if your rotary cutter is stored outside and exposed to weather for long periods of time.
You’ll want to make sure that the slip clutch has not seized. To do this, loosen the nuts on the clutch bolts ½-turn, then engage the PTO for a few seconds to make the clutch slip. Afterwards, you’ll then retighten the nuts with the same ½-turn to reset.
After the rotary cutter has been stored for thirty days or more, it’s a good idea to perform the following check:
- Make a trial run in the heaviest operating conditions expected. If any clutch slips noticeably, tighten the eight adjusting bolts no more than 1/4 turn between trial runs until the clutch slippage is reduced.
- Draw a mark across the clutch facing of each slip clutch. When subjected to shock loads, a separation of the marks will assure that the clutch setting is correct.
If you are using the rotary cutter for the first time, check the slip clutches during the first hour of operation for excessive heat build-up due to unexpected slippage.
You’ll also want to make sure there is no rust or corrosion. This is especially true if your rotary cutter is stored outside where it can get rained on.
Remember, your slip clutch protects not only your rotary cutter, but your tractor, too. Making sure it is in functioning order will help make sure that your equipment has a long working life. Check out your product manual for more information on checking, adjusting, and maintaining your slip clutch.
CONCLUSION
We’ve just covered four things to check before you use your rotary cutter, which included:
- Check the grease zerks to make sure they are properly greased.
- Check the gearbox and driveline lubrication levels.
- Check the blades for wear and proper installation.
- Check the slip clutch and make sure it’s operational.
Every rotary cutter is a little different, so make sure to check with your product manual for the most accurate information regarding your equipment.
Interested in checking out all the rotary cutters manufactured and sold by IronCraft? Click here. You can find the product manual for every rotary cutter on their page.
Be smart. Be safe. And enjoy your cutter.